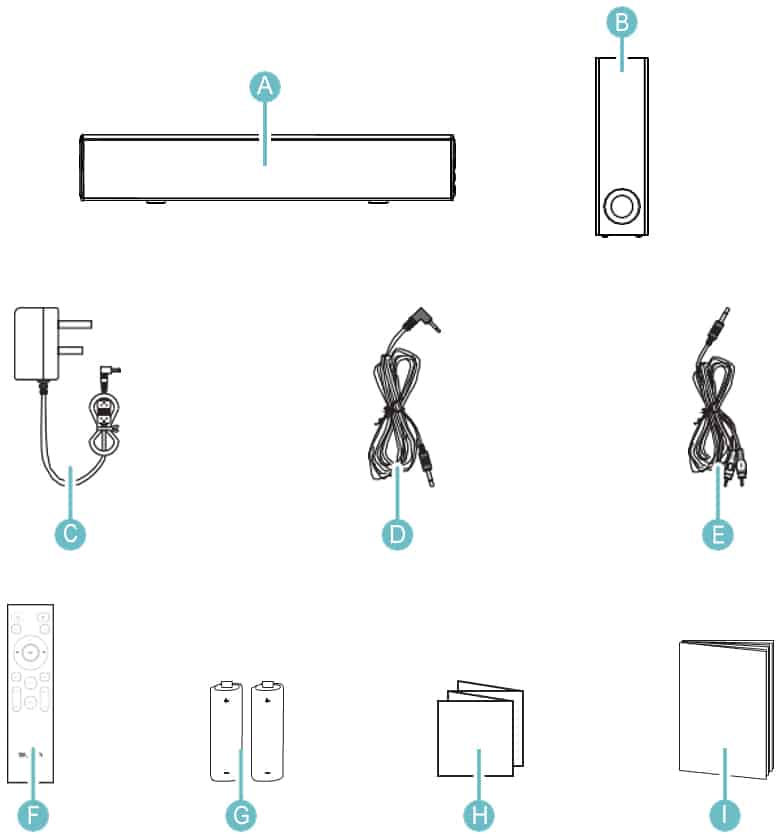
A. Majority Bowfell Plus Soundbar
B. Subwoofer
C. Adapter
D. 3.5mm to 3.5mm Audio Cable
E. 3.5mm to RCA Stereo Audio Cable
F. Remote Control
G. “AAA” size batteries
H. Welcome Guide
I. Instructions Guide
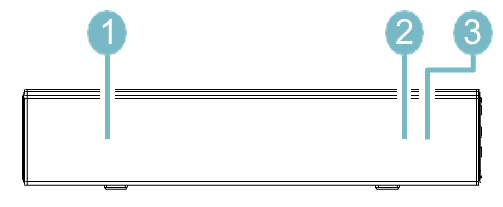
Front View
- Speaker Drivers
- Remote Control Sensor
- LED Indicator Light
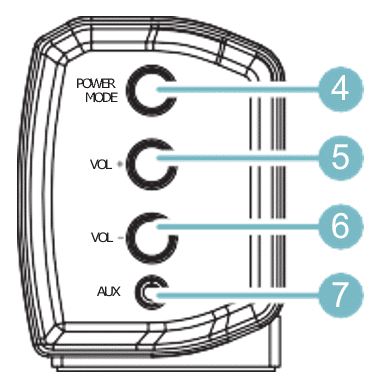
Side View
4. Press and hold for 3 seconds to switch the unit on/off. Press to switch between Bluetooth, USB, AUX or OPTICAL in.
5. Volume increase
6. Volume decrease
7. 3.5mm stereo AUX/RCA
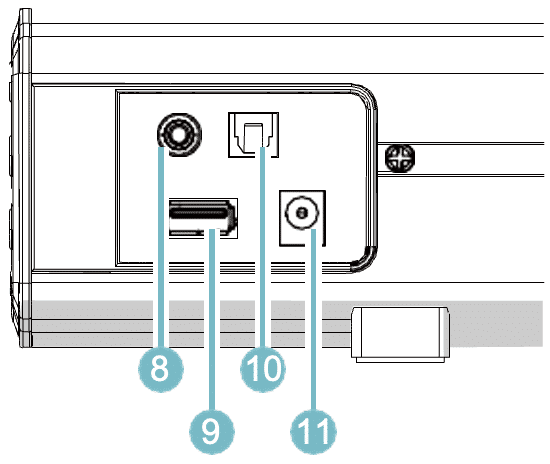
Rear View
8. Subwoofer Output
9. USB Socket
10. OPTICAL In Socket
11. DC 18V 2.3A Socket
Automatic Power Off Function
The Majority Bowfell Plus will automatically go to standby mode after 180 minutes if the connected TV is switched off.
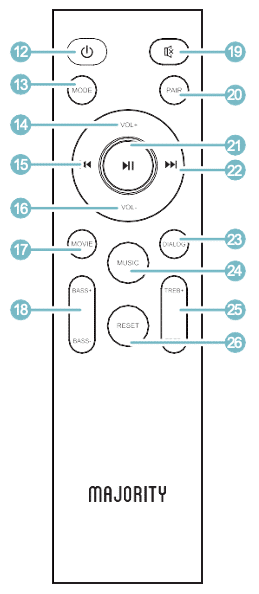
12. Power On/Off
13. MODE: Switch modes.
14. Volume+: Increase volume.
15. Back step: Use in Bluetooth/USB mode to go back a track.
16. Volume-: Decrease volume.
17. MOVIE: Set the MOVIE mode sound effect.
18. BASS+/-: It can adjust the Bass volume in mode of MUSIC.
19. MUTE: Mute/unmute sound.
20. BT PAIR: Disconnect the bluetooth device.
21. Play/Pause: In Bluetooth/USB mode, press to pause/play media.
22. Forward Step: Use in Bluetooth/USB mode to go forward a track.
23. DIALOG: Set the DIALOG mode sound effect.
24. MUSIC: Set the MUSIC mode sound effect.
25. TREBLE+/-: It can adjust the Treble volume in mode of MUSIC.
26. RESET: Reset volume/EQ back to the default state.
Please note all (Ref.) refer to the Controls and Functions in the above diagrams.
Mode Indicator Lights
| State | LED Indicator Light |
| Power Off | Red |
| Optical Mode | Orange |
| USB Mode | Light Blue |
| AUX Mode | Green |
| Bluetooth Ready | Flashing Blue |
| Bluetooth Connected | Blue |
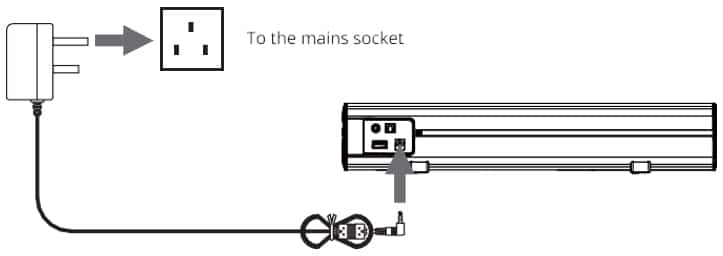
Connecting to the Mains Supply
Ensure that the power supply voltage is within the range of 100V~240V. Any other voltage may cause damage to the unit.
Unwind the mains cable to its full length. Connect the mains plug to a mains socket. Ensure that the mains plug is fully inserted into the mains socket.
The mains plug/appliance coupler is used as the disconnect device. The disconnect device must remain readily operable.
Connect the Adapter to the unit and AC Socket (Ref.10).
Ensure all audio connections of the unit are connected before connecting to the mains power socket.
Unplug the power cord from the outlet when the unit is not in use for an extended period of time.
Connecting the Subwoofer with the Soundbar
Follow the below instructions to connect the wired subwoofer to the soundbar.
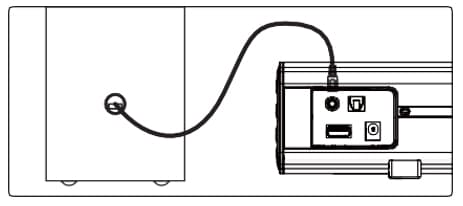
- Plug the soundbar into the mains sockets. Press the POWER button on the unit or the button (power logo) on the remote control to switch on the unit.
- Using the RCA audio cable from the subwoofer to connect to the SW.OUT jack (subwoofer out) on the soundbar.
- When audio is played through any source, the soundbar will automatically use the connected subwoofer.
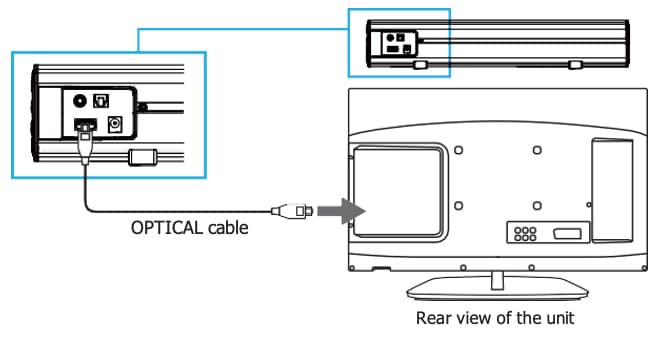
Using the Optical Input
You will need an audio source with an Optical Audio Output and a Digital Optical Audio cable (not included).
Connect the Optical cable to the soundbar (Ref.9).
Press the OPTICAL button on the remote control or on the main unit (Ref.4/Ref.11) to switch to Optical mode. The mode indicator LED will turn ORANGE.
Using the native controls on your connected device, ensure the audio settings are set to PCM or Optical Audio.
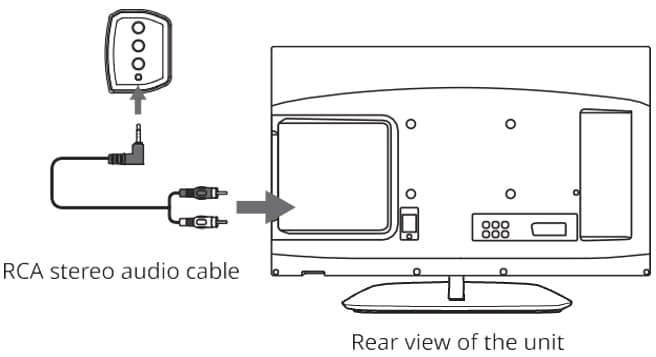
Using the RCA Input
You will need an audio source with an RCA Output and an RCA cable (included).
Connect the RCA cable to the RCA output on the audio source and to the AUX on the speaker bar (Ref.7).
Press the POWER/MODE button on the remote control or the main unit (Ref.4/Ref.11) to select AUX mode. The mode indicator LED will turn GREEN.
Using the native controls on your connected device, make sure the audio settings are set to Analog Stereo output/RCA/Audio output.
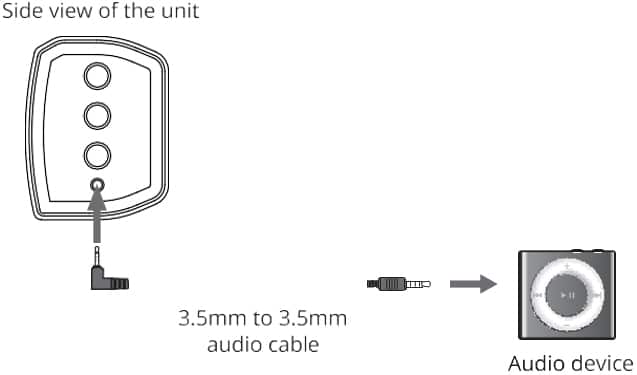
Using the MP3 LINK Connection (AUX)
Plug one end of a 3.5mm audio input cable (included) into the AUX on the unit (Ref.7).
Plug the other end of the cable into the audio output/headphone output on your MP3 player or other audio source.
Press the POWER/MODE button (Ref.4/Ref.11) repeatedly to enter AUX mode. The mode indicator will turn GREEN.
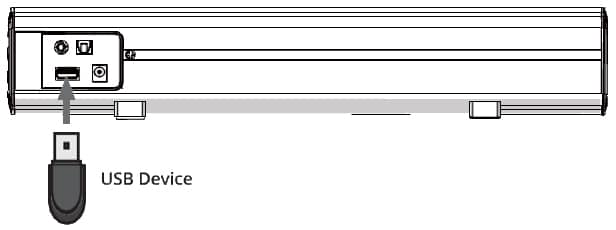
Using the USB Input
- Connect your USB device to the USB jack (Ref.9) on the soundbar.
- Press the ‘MODE’ button (Ref.21) on the remote, and the LED indicator will be LIGHT BLUE.
- Play music files from the USB device through the soundbar.
Bluetooth Operation
Pairing a Bluetooth Device for the first time
Select and press the MODE directly on the remote control (Ref.21) or on the soundbar (Ref.4) until Bluetooth mode is selected, indicated by a blue flashing light.
Using the native controls on your Bluetooth device, select the “Majority Bowfell” when prompted to choose a Bluetooth device.
If your device requests a password, enter the default ‘0000’. If you encounter issues at this stage, please refer to the user manual for your Bluetooth device for instructions on pairing and connecting Bluetooth devices.
When successfully paired and connected a beep will issue from the unit and the Pairing indicator will display a solid blue light. After initial pairing, the unit will stay paired unless unpaired manually by the user, or until the device is reset.
To unpair, hold down the PAIR button for 3 seconds. You can now pair the device with another Bluetooth device.
If your device should become unpaired or you find it is unable to connect, repeat the steps above.
Troubleshooting
If you encounter an issue with your soundbar, please refer to the unit following checklist.
| No power/function | Check that the power is switched on at the wall. Check whether the power adaptor is properly connected to power outlet. |
| No sound | Check whether unit is set to MUTE. Check whether MODE is correctly selected. Check whether cables are properly installed. |
| No sound from Bluetooth connection | Check whether you have pressed PAIR button before pairing. Check whether external device requires password “0000”. |
| Function disturbance | Switch off and unplug the unit. Leave it for 2 minutes and switch it on again. If a particular mode is causing problems, please try an alternative connection such as Optical, AUX or Bluetooth. |
| Remote control function issues | Check whether the battery needs replacing. Replace if necessary. Check whether there are obstacles blocking the remote sensor. |
| No sound when connection and switches to OPTICAL IN mode | Check and ensure the audio setting of the input source (e.g. TV, games console, DVD player, etc.) is set to PCM mode while using digital connection (such as Optical, HDMI and COAXIAL). |