Boxworth
Box Contents
- Boxworth Boombox
- Mains Cable

Controls and Functions
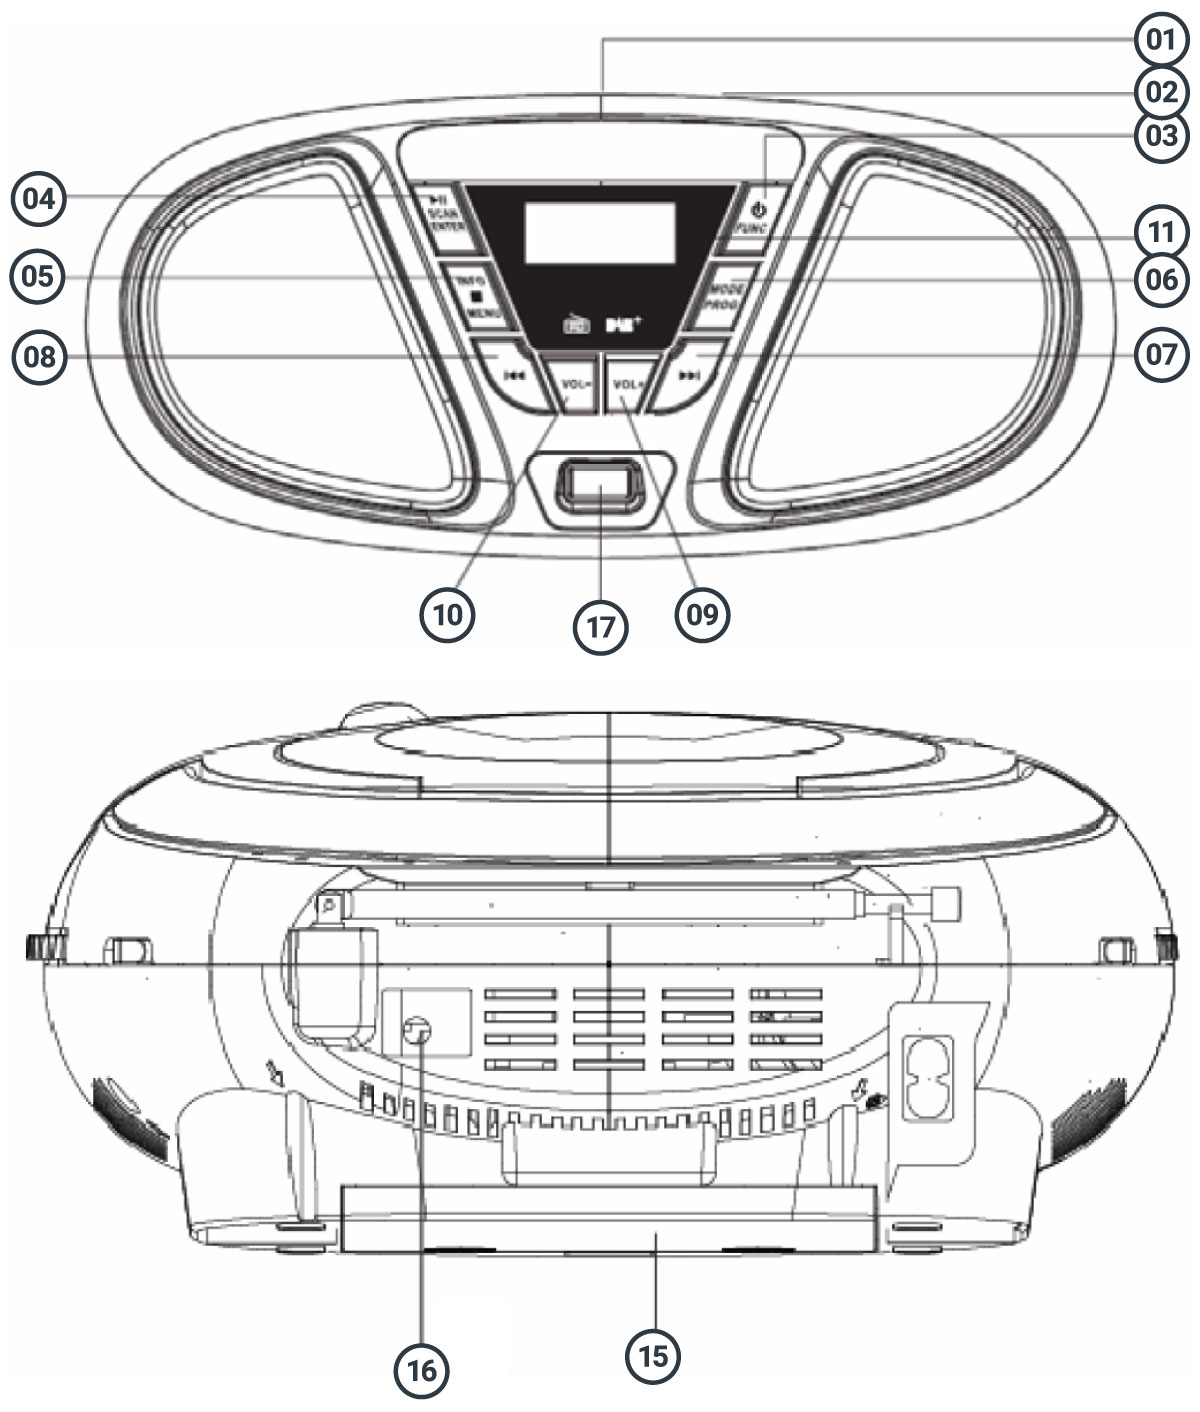
- CD Compartment
- CD Open/Close
- POWER ON/OFF or MODE Switch button
- Play/Pause/Scan/Enter
- Info/Stop/Menu Button
- Preset/Prog Button
- SKIP+ or TUN+ Button
- SKIP- or TUN- Button
- Volume Up (VOL+) Button
- Volume Down (VOL-) Button
- LCD Screen
- FM Antenna
15. Battery Compartment
16. Earphone Jack
17. USB Port
Instructions Guide
Power Supply
Using AC
Before use, check that the rated voltage of your unit matches your local voltage.
Note: Plug is used as the disconnect device. The disconnect device shall remain readily operable.
Using Batteries
Disconnect the AC power cord from the AC inlet of the unit. Battery power is cut automatically by the cord while it is connected.
When the volume decrease, or the sound distorts, replace all of the batteries with new ones.
Insert 6 x 1.5V (R14/UM2/C) batteries.
Attention should be drawn to be the environmental aspects of battery disposal. Batteries shall not be exposed to excessive heat such as sunshine, fire or the like.
CAUTION! The apparatus shall not be exposed to dripping or splashing and that no objects filled with liquids, such as vases, shall be placed on the apparatus.
Operation
Listening to Music MP3/CD Disc
- Insert the main plug into a main supply power outlet. Press and hold the Power ON/OFF Button (Ref. 3) to turn on the unit.
- Press the MODE button (Ref. 3) to CD MODE.
- To open the CD door (Ref. 1), lift the Open/Close area near the CD door (Ref. 2). Insert disc into the disc compartment with the title side upwards.
- The total playing track number will show on the LCD display (Ref. 11) and the unit will begin to play the MP3/CD disc.
- Press SKIP FORWARD button (Ref. 7) / SKIP BACKWARD button (Ref. 8) to jump to next or previous track.
- Press and hold SKIP FORWARD button (Ref. 7) / SKIP BACKWARD button (Ref. 8) to search rapidly within a track to locate a specific passage.
- During MP3/CD play, press the PLAY/PAUSE button (Ref. 4) to pause MP3/CD playing- the play indicator dot will blink. Press again to resume.
- Press the STOP button to stop the MP3/CD playing, and total number of tracks will show on the LCD display.
- After all tracks have been played, the MP3/CD player will stop automatically, and total number of tracks will also show on the LCD display.
Note: Do not open the CD compartment while the disc is playing or rotating. This unit can play Music CD Disc format.
To Program Specific Track (up to 20 Tracks)
- Load the CD you wish to program.
- Make sure the CD is in stop mode.
- Press the PROG button (Ref. 6) once,” PROGRAM INPUT P-01 01” will show on the LCD display.
- Press the SKIP+ button / SKIP- button until the desired track number is reached.
- Press the PROG button to store the selection.
- Repeat (4) & (5) steps until you have entered all the tracks.
- Press the Play button to play the Program tracks.
- After all memory tracks have been played, the CD player will stop automatically.
To Repeat Program tracks
- During program play, press and hold the Preset button (Ref. 6) one time to repeat the specifically programmed track (“Rep one” show on the LCD display).
- Press and hold the Preset button again to repeat all the programmed tracks (“Rep all” show on the LCD display).
- Press and hold the Preset button once again to cancel repeat mode.
Repeat 1/ Repeat All/Random Playback
- During CD playback, press SKIP FORWARD button / SKIP BACKWARD button to select a track you wish to repeat.
- Press and hold the Preset button a first time, you can see “Rep one” showed on the display, unit will play the desired track repeatedly.
- During CD playback, press Preset button continuously until the “Rep all” appear on the LCD display. The unit will play all the tracks on the disc repeatedly.
- Press the Preset button again, “Random” will be showed on the LCD Screen, the unit will randomly play all the tracks in the CD continuously.
- Press the Preset button again, “Intro” will be showed on the LCD Screen. The unit will play the beginning 10 seconds of all tracks on the disc.
- To cancel the setting, press the Preset button continuously until the “[CD]” appear on the LCD display.
Listen to music / radio through headphones or earphones
There is a headphone jack on the back of unit (Ref. 16). Insert the headphone or earphone plug of headphone or earphone into this jack and enjoy music or the radio in private.
Play other audio devices though our set (Auxiliary Input)
You can enjoy the music of a digital MP3 player, computer or any other external audio device (with a 3.5mm stereo jack) though the set.
- Insert an audio cable (not included) with 3.5mm plug on each end into the HEADPHONES jack or LINE OUT jack of your MP3 player or computer, and the other into the AUX-IN jack of the set. This cable is available in any electronic store.
- Connect the supplied AC power cord or batteries.
- Press the MODE button switch to AUX MODE.
- Turn on your MP3 player or computer, adjust the VOLUME control of the MP3 player/computer and the set to the desired level.
- Press Power button to standby mode.
Listening from USB
- Insert the main plug into a main supply power outlet.
- Press MODE button switch to USB MODE.
- Insert the USB device to USB port (ref. 17), and play music.
- Press and hold the Power ON/OFF button to turn off the unit power.
Bluetooth Pairing Guide
- Insert the main plug into a main supply power outlet.
- Press and hold the Power ON/OFF button for more than 1 sec. to power off.
- Press the MODE button switch to BT MODE.
- Turn on the Bluetooth mode of your Bluetooth device and enable the search or scan function to find the “Majority DAB Boombox”, select “Majority DAB Boombox” from the device list when it appears on your device screen, click “Majority DAB Boombox” to pair (link) the unit with your device, “tap-tap-tap” can be heard and unit will playback the music from your Bluetooth device.
- After successfully pairing (linking), you can press the PLAY/ PAUSE button to play music from your Bluetooth device wirelessly to the speaker.
- Press the VOL-/+ to adjust volume sound level.
- You can also press the PLAY/PAUSE button to play or pause the music playback.
- Press the SKIP + button / SKIP – button to skip previous or next song.
- If turning on your Bluetooth device to Bluetooth status first, the turning to BT mode, tap-tap-tap can be heard, and you can play the music from your Bluetooth device.
Listening to the FM Radio
- Press and hold Menu button, you can press SKP-/+ buttons to select.
- Press SKP-/+ buttons and press ENTER button to select Preset Recall.
- Press SKP-/+ buttons and press ENTER button to select Preset Store.
- Press SKP-/+ buttons and press ENTER button to select Audio setting, Press SKP-/+ buttons and press ENTER button to select Stereo or Mono.
- Press SKP-/+ buttons and press ENTER button to select Scan setting.
- Press SKP-/+ buttons and press ENTER button to select System setting. Press SKP-/+ buttons and press ENTER button to select Time/Date/Backlight/Contrast Set/EQ/Language/Factory/System Version.
- Press and hold POWER on/off button to turn off radio mode.
To obtain the best FM reception, fully extend the FM antenna. Avoid a close proximity to the speakers and other electrical appliance.
Listening to the DAB Radio
- Press and hold the MENU button, you can press SKP-/+ buttons to select Station List Preset Recall/Preset Store /Full scan / Manual tune / Prune Invalid / System setting.
- Press SKP-/+ buttons and press ENTER button to select Station List.
- Press SKP-/+ buttons and press ENTER button to select Preset Recall.
- Press SKP-/+ buttons and press ENTER button to select Preset Store.
- Press SKP-/+ buttons and press ENTER button to select Scan.
- Press SKP-/+ buttons and press ENTER button to select Manual tune the DAB station.
- Press SKP-/+ buttons and press ENTER button to select whether Prune station (yes or no).
- Press SKP-/+ buttons and press ENTER button to select System setting. Press SKP-/+ buttons and press ENTER button to select Time/Date/Backlight/Contrast Set/ EQ /Language/Factory/ System Version.
Note: If there is no DAB reception at any time, change the position of the unit or adjust the antenna. Press SCAN button to start a new search.
Storing FM or DAB stations
You can store up to 20 pre-set FM stations or DAB stations.
- Select a FM or DAB station.
- Press and hold the PROG button, “Preset Store” will show on the LCD display.
- Press SKIP-/+ buttons to select the preset position, then press ENTER button to save the station to the desired preset.
- Repeat steps 1-3 to store more FM or DAB stations.
NOTE: This unit can store 20 stations for FM radio and 20 stations for DAB radio.
Selecting pre-set FM or DAB stations
- When unit is in FM or DAB mode, press PROG button, “Preset Recall” will appear on the LCD display.
- Press the SKIP-/+ buttons to navigate through the preset
- FM or DAB stations, and press ENTER button to recall the current preset station.
General Manual Setting
FM Mode:
- Press and hold MENU button, you can press SKP-/+ buttons to select Scan setting / Audio setting / System setting/Preset Store/ Preset Recall.
- Press SKP-/+ buttons and press ENTER button to select Scan setting.
- Press SKP-/+ buttons and press ENTER button to select ALL Station or Strong Station.
- Press SKP-/+ buttons and press ENTER button to select Audio setting.
- Press SKP-/+ buttons and press ENTER button to select Stereo or Mono.
- Press SKP-/+ buttons and press ENTER button to select System setting.
- Press SKP-/+ buttons and press ENTER button to select Time/ Date/Backlight/Contrast/Set/Language/Factory/System Version.
DAB Mode:
- Press and hold MENU button, you can press SKP-/+ buttons to select Station List/Full scan / Manual tune /Prune Invalid / System setting.
- Press SKP-/+ buttons and press ENTER button to select Scan setting.
- Press SKP-/+ buttons and press ENTER button to select Manual tune the DAB station.
- Press SKP-/+ buttons and press ENTER button to select whether Prune station (yes or no).
System Setting for FM/DAB/AUX Mode:
- Press and hold MENU button. Press SKP-/+ buttons and press the ENTER button to select System setting.
- Press SKP-/+ buttons and press Select button to select Time/Date. Press ENTER Button Press SKP-/+ buttons to set Time/Date/Set Hour System/Set date Format/Auto Update.
- Press SKP-/+ buttons and press ENTER button to select Backlight Setting/Timeout Setting/Back Light Level.
- Press SKP-/+ buttons and press ENTER button to select Contrast Setting.
- Press SKP-/+ buttons and press ENTER button to select EQ / Normal/ Classic/ Pop/ Jazz/ Rock/ Flat/ Movie/News/
- Press SKP-/+ buttons and press Select button to select Language setting (from English / Deutsch / Francaise / Norsk Sprak / Italiano / Svenska / Dansk / Polski / Suomi), press ENTER button to confirm current operation.
- Press SKP-/+ buttons and press ENTER button to select Factory Reset setting (YES or NO), press ENTER button to confirm current operation.
- Press SKP-/+ buttons and press ENTER button to select System Version to show version name.
Troubleshooting
CD does not play
- Check that you are in CD mode. If you are not already in CD mode, press Power button to Function Select Status, then press the Mode button to select CD Mode.
- When unit in CD mode, you can see the total number of the tracks, please press PLAY/PAUSE button to play the CD disc.
- Take out the CD and check that it is not marked or scratched. Damaged CDs cannot be played in the CD boombox or may skip or not rotate correctly in the CD compartment.
- Please check that you are using an original audio CD and not a copy. Often copied CDs will not play.
The MODE buttons do not respond.
- Check that mains power wall socket is switched on.
- Check that power cord plug inserted into the AC socket of the unit fully.
- Check that you are trying to use the MODE buttons for the mode that you are in.
- If you are using batteries, they may be exhausted and need to be replaced.
- If you are using mains power, unplug the mains unplug the mains power. Leave the boombox for 3 minutes and then reconnect the power.
Radio reception is poor.
- Check that you have extended the wire radio aerial in a vertical position.
- Press SCAN button or TUN+/- button to tune radio station.
- Check there are no other electrical appliances within 1 metre of your boombox, which may be causing interference.
- Try moving your boombox to another location.
Remove a CD
- Lift the lid of the CD player on the front edge, where is a scooped recess.
- Put your thumb on the central spindle and put your fingers under the outside edge of the CD and lift off and remove the CD from the compartment.
- Close the lid of the CD player.
Caring for CDs
- Do NOT touch the playback side of the CD.
- Do NOT attach paper or tape or any other material to the disc.
- Fingerprints and dust on the disc will cause sound deterioration. Wipe the disc from the centre outwards with a soft cloth. Always keep the disc clean.
- If dust or marks cannot be removed with a soft cloth, wipe the disc lightly with a slightly damp soft cloth and then wipe with a soft dry cloth.
- Do NOT use any type of solvent, commercially available cleaners, or anti-static spray for vinyl as it may damage the disc.
- Do NOT store discs in places subject to direct sunlight or near a heat source.
- Do NOT store discs in a place subject to moisture or dust, such as a bathroom or near a humidifier.
- Always store discs vertically in a case, stacking or placing objects on discs may cause warping.
Warranty
Register your Majority product within 30 days of purchase to activate your extended 3 Year Warranty. Gain access to all the benefits and lifetime technical support (see our Extended Warranty details for more info).
Specifications
| Model | Majority Boxworth Go |
| Range | DAB: 174.928-239.1MHZ FM: 88-108MHZ |
| Power | AC 100-240V~ 50/60Hz, DC: 9V |
| USB Port | 5VDC,200mA |
| Dimensions | 23.8 x 20.5 x 12cm |
| Weight | 945g |
| Batteries | 6 x 1.5V (R14/UM2/C) |
Safety Info
IMPORTANT
Please read all instructions carefully before use.
WARNING
Risk of electric shock. Do not open.
- Read these instructions:
- Heed all warnings.
- Follow all instructions in the user manual.
- Do no clean the apparatus near or with water.
- Do not block any ventilation openings. Install in accordance with the manufacturer’s instructions.
- Do not install near any heat sources such as radiators, heat registers, stoves, or other apparatus (including amplifiers) that produce heat.
- Protect the power from being walked on or pinched particularly at plugs, convenience receptacles, and the point where they exit from the apparatus.
- Only use attachments/accessories specified by the manufacturer.
- Unplug this apparatus during light storms or when unused for long periods of time.
- Refer all servicing to qualified service personnel. Servicing is required when the apparatus has been damaged in a way, such as power-supply cord or plug is damaged, liquid has been spilled or objects have fallen into the apparatus, the apparatus has been exposed to the rain or moisture, does not operate normally or has been dropped.
- No naked flame sources, such as lit candles, should be placed on the apparatus.
- Dispose of used electrical products and batteries safely according to your local authority and regulations.
Addition Warnings
The apparatus shall not be exposed to dripping or splashing and no objects filled with liquid, such as vases, shall be places on the apparatus.
Main plug is used to disconnect device and it should remain readily operable during intended use. In order to disconnect the apparatus from the main power completely, the power plug should be disconnected from the main socket outlet completely.
Battery shall not be exposed to excessive heat such as sunshine, fire or the like.
Recycling Electrical Products
You should now recycle your waste electrical goods and in doing so help the environment. This symbol means an electrical product should not be disposed of with normal household waste. Please ensure it is taken to a suitable facility for disposal when finished with.
Download/print as a PDF
Want to save the above instructions as a PDF? Simply click the print icon below to save or print the user manual.
Contact Support
Having an issue with your product or can’t figure something out? Get in touch with our support team.