A. Majority Fitzwilliam 3 Tuner
B. Power Adapter (UK or EU Plug)
C. Remote Control

Front View

- Remote Control Sensor
- USB connection
- Earphone Jack
- Display
- MODE Button
- NFO Button
- MENU Button
- SCAN/Pause/Play Button
- Stop Button
- Repeat Button
- Forward Button
- PRESET Button
- BACK Button
- SELECT/SCROLL Dial
- Power/VOLUME Dial
Back View

16. Mains Connection Cable
17. WLAN Antenna
18. Audio Output L/R
(analogue, RCA jack)
19. Analog Audio
(input/output, 3.5mm jack)
20. Digital Output (optical)
21. Digital Output (Coaxial)
22. DAB/FM Antenna
Remote Control
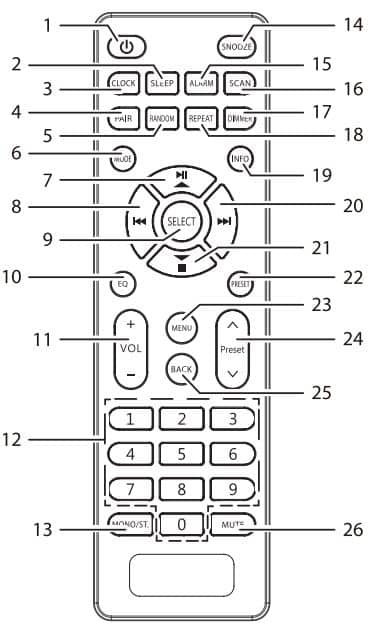
1. Power Button
2. SLEEP Button
3. CLOCK Button
4. PAIR button
5. RANDOM Button
6. MODE Button
7. Play/Pause/Up Button
8. Back Button
9. SELECT Button
10. EQ Button
11. VOL +/− Buttons
12. Number Buttons
13. MONO/ST. Button
14. SNOOZE Button
15. ALARM Button
16. SCAN Button
17. DIMMER Button
18. REPEAT Button
19. INFO Button
20. Forward Button
21. Down/Stop Button
22. PRESET Button
23. MENU Button
24. PRESET ./, Buttons
25. BACK Button
26. MUTE Button
Please note all (Ref.) refer to the Controls and Functions in the above diagrams.
Remote control operation range
The remote-control sensor on the front unit is sensitive to the remote control’s commands up to a maximum of 4 metres away and within a maximum of 60° arc.
Note that the operating distance may vary depending on the brightness of the room.
Connection
- The audio input/output (analogue), optical out (digital) and coaxial out (digital) are available on the back of the unit to connect A/V amplifier or HiFi system.
- Connect the antenna included in the supply to the antenna connection and extend it to the desired length.
- Connect the WLAN antenna included in the supply to the W-LAN socket at the back of the unit for WIFI connection.
- Unwind the mains cable to its full length. Connect the mains plug to the mains socket. The unit is now connected and ready to use
- To switch the unit off completely, unplug the mains cable from the mains socket
Be sure to connect the power cord to an AC outlet that supplies the correct voltage. Hold the power plug when plugging it into an outlet or unplugging it. Never pull or yank on the power cord.
Network Connection
This product only supports wireless network connection for network access and did not support wired LAN connection.
Wireless network
1. Check first of all whether the control lamps (LINK/ACT) of your router light up.
2. Proceed with the operations described in the below “Getting Started”. It is recommended to run through the setup wizard in the System Settings section.
This unit cannot be connected to a standalone modem directly. A router or a modem incorporated with a router has to be used. Since there are various connection, please follow the specifications and instructions of your telecommunication carrier, Internet service provider, and router setting guidebook.
Getting Started
Powering ON/OFF
1. Press the Power/VOLUME dial on the unit or Power button on remote control to switch the unit on.
2. Press the Power/VOLUME dial on the unit or Power button on remote control to switch the unit back to standby mode
Selecting Modes
Press MODE button on unit or remote control to access Mode Menu. Turn the SCROLL/SELECT dial on unit or press (Ref.8), (Ref.20) buttons on remote control to select, then press SCROLL/SELECT dial on unit or SELECT button on remote control to switch between Internet radio, Podcasts, Spotify, Music Player, DAB Radio, FM Radio, Bluetooth Audio and AUX In modes
When the unit is idle for approximately 15 minutes, it will automatically switch to standby. To switch the unit off completely, remove the mains plug from the main socket. Please turn the unit off completely to save energy when not in use.
Adjusting the Volume
- Turn the Power/VOLUME dial on the unit or press the VOL +/– buttons on the remote control to adjust the volume.
- If you wish to turn the sound off, press the MUTE button on the remote control. Press the MUTE button again, turn the Power/VOLUME dial on the unit or press the VOL +/– buttons on the remote control to resume normal listening
Navigating the Menu
- Press MENU button on the unit or remote control to access the menu.
- Turn the SCROLL/SELECT dial on the unit or press (Ref.7), (Ref.21) buttons on the remote to select your choice.
- Press the SCROLL/SELECT dial on the unit or SELECT button on the remote control to confirm your selection.
Initial Set-Up
When you first connect the unit to the mains socket, the display will show the welcome screen then with language menu shown up, turn SCROLL/SELECT
dial on unit or press (Ref.7), (Ref.21) buttons on remote control to change the display language of your choice and press the SCROLL/SELECT dial on unit or SELECT button on remote control to confirm. Then the privacy policy page will come up. Please visit the website mentioned in the page for the details of the privacy policy. Press SCROLL/SELECT dial on unit or SELECT button on remote control to accept for next step.
- To launch the initial Setup wizard, turn the SCROLL/SELECT dial on the unit or Backwards/Forwards buttons on remote control to select [YES], then press the SCROLL/SELECT dial on the unit or SELECT button on the remote control to confirm.
- In the next step you can select the time format. Select the desired setting [12] or [24] and press the SCROLL/SELECT dial on the unit or SELECT button on the remote control to move on to the next step
- Here it is possible to select which source (DAB/FM/Network/No update) the unit uses to obtain and update the time and date. If “Update from Network” selected, proceed to the next step to select time zone to ensure that the time is displayed correctly. And then select the “Daylight savings” is [ON] or [OFF].
- In the next step you can specify whether the product should remain connected to the Internet when on standby. Turn the SCROLL/SELECT dial on the unit or press Backward/Forwards buttons on the remote to select [YES], then press the SCROLL/SELECT dial on the unit or press SELECT button on the remote to confirm.
- Your radio will now scan for your wireless network, this may take a few seconds then a list of all the wireless networks will appear on the screen. Select the WLAN network you know and whether to use WPS (Push Button/Pin) or Skip WPS to enter the password using the displayed keyboard.
Connecting using the WPS button on your router
Connecting using the WPS (Wi-Fi Protected Setup) button on your router is a quick and easy way to connect your radio without having to type in a password. Select one of the following connection methods:
Push button
If your router has a WPS button you will notice [WPS] at the front of your network name.
6.(Ref.7), (Ref.21) buttons to select Push Button, then press SELECT button to confirm.
7. You will now see a message on the screen telling you to press the WPS button on your router. Press the WPS button on your router. Check your routers instruction manual if you are unsure which button is the WPS button.
8. Press the SELECT button to confirm. Your radio will now connect to your router, this may take a few seconds.
Pin (code number)
The radio generates an 8-digit code number. Enter this code number into the wireless router or access device.
Connecting using your wireless network password
If your router has not got a WPS button you will now be asked to enter your wireless network password, or you can select SKIP WPS which also take you to the password screen.
9. Press (Ref.7), (Ref.21)/(Ref.8), (Ref.20) buttons to select each letter/number of your password. Then press SELECT button to enter the selected letter/number.
10. When you have entered your password, press (Ref.7), (Ref.21)/(Ref.8), (Ref.20) buttons to select OK on the right of the screen.
11. After your radio has connected, press SELECT button to exit the setup.
Settings can be changed at any time in Menu-System Settings – Network – Network wizard
System Settings
Press the MENU button on unit or remote control to display the menu. Turn SCROLL/SELECT dial on unit or (Ref.7), (Ref.21) buttons on remote control to select System settings, then press SCROLL/SELECT dial on unit
Equaliser
This system supports a variety of equalizers and sound effects.
- Press the EQ button to access Equaliser menu
Alternatively, - During System settings mode, press (Ref.7), (Ref.21) buttons to select Equaliser and then press the SELECT button to confirm or SELECT button on remote to confirm
The display will show: NORMAL > CLASSIC > ROCK > POP > JAZZ > MY EQ > MY EQ PROFILE SETUP
- Press Play/Pause/Up/Down/Stop buttons to select and then press the SELECT button to confirm.
- For [MY EQ], please go to [My EQ Profile Setup] for custom setting before select.
- During [My EQ Profile Setup], press (Ref.7), (Ref.21) select [Bass/Treble] and then press SELECT button to confirm. Press (Ref.7), (Ref.21) to select desired level and then press SELECT button to confirm. Press BACK button to exit and then press Backwards/Forwards buttons to select [YES] and press SELECT button to confirm. The Display will show Equaliser Saved.
Network
- During System settings mode, press (Ref.7), (Ref.21) buttons to select Network and press the SELECT button to confirm.
- Press (Ref.7), (Ref.21) buttons to select from the following settings, and then press the SELECT button to confirm

- Press the BACK button on the unit or remote control to cancel the setting and return back to the previous menu.

Time/Date
The Time/Date can be automatically set once it has been connected to the Internet, DAB or FM radio station with time/date information. You may also adjust the Time/Date manually Press CLOCK button on remote control can access Set Time/Date menu to adjust Time/Date, Alternatively
During System settings mode, press (Ref.7), (Ref.21) buttons to select Time/Date and press the SELECT button to confirm. Press (Ref.7), (Ref.21) buttons to select Set Time/Date and press the SELECT button to confirm
- The date digits will flash on the display.
- Press (Ref.7), (Ref.21) buttons to adjust the day and then press the SELECT button to confirm.
- Repeat above Step (2) to set the Month/Year/Hour/Minute.
- The date and time settings are now complete.
For the other settings under Time/Date, press (Ref.7), (Ref.21) buttons to select from the following options and then press the SELECT button to confirm

Inactive Standby
Use the Inactive Standby to turn off the unit after a certain time in play mode.
1. During System settings mode, press (Ref.7), (Ref.21) buttons to select Inactive Standby and press SELECT button to confirm.
2. Press (Ref.7), (Ref.21) buttons to select between Off, 2 hours, 4 hours, 5 hours and 6 hours. Press SELECT button to confirm.
Language
1. During System settings mode, press 12 w/s 3 buttons to select Language and then press the SELECT button to confirm.
2. Press (Ref.7), (Ref.21) buttons to change the display language of your choice.
3. Press the SELECT button to confirm.
Factory Reset
There may be times when you need to reset your unit back to the factory settings especially when you have moved house. If you experience reception problems you may want to reset and try again. If you move to another part of the country and pick up the local and national DAB stations in that area, your previously tuned channels may no longer be available.
1. During System settings mode, press (Ref.7), (Ref.21) buttons to select Factory Reset, and press the SELECT button to confirm.
2. Press Backwards/Forwards buttons to select [Yes], and press the SELECT button to confirm or select [No] to cancel.
Software update
1. During System settings mode, press 12 w/s 3 buttons to select Software update and then press the SELECT button to confirm.
2. Press (Ref.7), (Ref.21) buttons to select “Auto-check setting” or “Check now”, and then press the SELECT
Before downloading software, ensure that the radio is plugged into a stable mains power connection. Interrupting the mains supply during software download can lead to functional disturbances and/or damage to the unit! button to confirm.
Setup wizard
The setup wizard is available in the system settings section; you can run through this to configure settings for date/time and network. Once this has finished, your radio is ready to use.
Info
1. During System settings mode, press (Ref.7), (Ref.21) buttons to select Info and then press the SELECT button to confirm.
2. The software version, Spotify version, Radio ID and Friendly name will show on the display.
Privacy policy
1. To see the Privacy policy page, press MENU to go to System settings – Privacy policy.
2. After Factory reset, you need to accept the Privacy policy again.
Backlight
1. During System settings mode, press (Ref.7), (Ref.21)buttons to select Backlight and then press the SELECT button to confirm.
2. For the other settings under Backlight, press (Ref.7), (Ref.21) buttons to select the following options and then press the SELECT button to confirm
Alternatively, press DIMMER button on remote control repeatedly can adjust the Backlight level under ON mode and Standby mode.
If Timeout set Off, the display brightness at standby will keep as operation mode not able to adjust by DIMMER button on remote control.
Internet Radio
To listen to internet radio your radio must be connected to the internet. Try to position your radio as close as possible to your router to get the best connection speeds. When Internet Radio mode is selected, the radio connects with the Frontier Silicon Internet radio portal to download a list of stations. Once a station is selected, the radio will connect directly to that station.
Press MODE button on unit or remote control to access Mode Menu. Turn the SCROLL/SELECT dial on unit or press (Ref.8), (Ref.20) buttons on remote control to
select Internet radio mode, then press SCROLL/SELECT dial on unit or SELECT button on remote control to confirm.
During Internet Radio mode, press the MENU button on the unit or remote control to access the menu. You can choose between: Last listened, Station list, System settings and Main menu. Press (Ref.7), (Ref.21) buttons to select and press the SELECT button to confirm.
When internet radio is restarted, the last listened stations is automatically selected. To return to [Station List], press BACK button..
Last listened
1. Press (Ref.7), (Ref.21) buttons to select the history of stations that you have listened to before.
2. Press the SELECT button to confirm.
Station List
If it is the first time listen Internet radio, the radio will be in [Station List]. Press (Ref.7), (Ref.21) buttons to select from the following options, and then press the SELECT button to confirm.
- “Countries” You can search specifically for stations from your country. Within this scope, it will display local radio.
- Search You can search stations using various keywords. The name and a description of your selected station will show on the display.
- Location You can select for stations from a list of countries available Popular Select station from a list of the most popular internet stations from around the
world. - Discover Select stations from various categories in the menu: Country, Genre or Language.
Press the BACK button on the unit or remote control can move back a menu level.
Preset Stations
The preset Internet radio stations are stored in the radio and cannot be accessed from other radios.
- To store an Internet radio preset, you must first be listening to the station that you would like to save. Press and hold the PRESET button on the unit or remote control until the display shows the “Save to Preset”.
- Select one of the 30 presets to store the current station by press (Ref.7), (Ref.21) buttons to select the number and press the SELECT button to confirm.
Recalling a Stored Station
1. To select a preset, press the PRESET button on the unit or remote control, and then press the (Ref.7), (Ref.21) buttons to select one of the listed preset stations.
2. Press the SELECT button to confirm the selection
Alternatively, on remote control,
– Press Preset up/down arrow buttons to switch through the preset stations.
– Or press the number keys (0-9) on remote control can switch to preset station 1-10 directly
– If there no station be saved, it will show Preset empty.
Operation of Preset and Recall stations are same for Internet Radio/Podcasts, DAB and FM.
Internet Radio Display Modes
Every time you press the INFO button on the unit or remote control, the display will show the following display modes: Channel Info/Description- Language/Location – Bit rate/Sound format/Sampling rate – Playback buffer – Date
Podcasts
To listen to Podcasts your radio must be connected to the internet. Try to position your radio as close as possible to your router to get the best connection speeds. Press MODE button on unit or remote control to access Mode Menu. Turn the SCROLL/SELECT dial on unit or press (Ref.8), (Ref.20) buttons on remote control to select Podcasts mode, then press SCROLL/SELECT dial on unit or SELECT button on remote control to confirm.
Last listened
1. Press (Ref.7), (Ref.21) buttons to select [Last listened], then press SELECT button to confirm.
2. Press (Ref.7), (Ref.21) buttons to select the history of stations that you have listened to before and press SELECT button to confirm.
Podcast List
During Podcasts mode, press MENU button to access the menu. Press the (Ref.7), (Ref.21) buttons to select [Podcast list] and press the SELECT button to confirm.
When radio is restarted, the last listened stations is automatically selected. To return to [Podcast list], press BACK button. If it is the first time listen Podcasts radio, the radio will be in [Podcast list]. Press the (Ref.7), (Ref.21) buttons to select from the following options, and then press the SELECT button to confirm.
- Countries” You can search specifically for stations from your country. Within this scope,it will display local radio stations in your location.
- Search You can search stations using various keywords. The name and a description of your selected station will show on the display.
- Location You can select for stations from a list of countries available
- Discover Select stations from various categories in the menu: Country, Genre or Language
Saving and Recalling Preset Station
Refer to “Preset Stations” and “Recalling a Stored Station” under Internet Radio for instruction.
SPOTIFY CONNECT
Use your phone, tablet or computer as a remote control for Spotify. Go to spotify.com/connect to learn how.
Licenses
The Spotify Software is subject to third party licenses found here: https://www.spotify.com/connect/third-party-licenses
Music Player Operation
The built-in Music Player allows you to play unprotected audio files stored on a connected USB mass storage device via the device. Press MODE button on
unit or remote control to access Mode Menu. Turn the SCROLL/SELECT dial on unit or press (Ref.8), (Ref.20) buttons on remote control to select Music Player mode, then press SCROLL/SELECT dial on unit or SELECT button on remote control to confirm.
USB Playback
- When a USB device is connected to the unit under Music Player mode, the display shows “USB disk attached – Open folder?”, press SELECT button to confirm [YES].Alternatively,
- During Music Player mode, press the (Ref.7), (Ref.21) buttons to select USB playback and press the SELECT button to confirm. Press the (Ref.7), (Ref.21) buttons to select and press SELECT button to confirm a song file.
The unit may not be compatible with all USB devices; this is not an indication of a problem with the unit.
Playing Music via Music Player
- Press SCAN/Play, Pause button on unit or Play, pause/ Up arrow button on remote control to play/pause music or
- Press (Ref.8), (Ref.20) buttons on unit or remote control to skip to the previous/next track
My playlist
- Under menu of Music Player mode, press (Ref.7), (Ref.21) buttons to select My playlist and press the SELECT button to confirm.
- Press (Ref.7), (Ref.21) buttons to select songs and press SELECT button to start playing through the playlist.
Saving songs into My playlist
- To store a song into My playlist, you must first be listening to the song that you would like to save.
- Press and hold the SELECT button to save.
Repeat Mode
- Under menu of Music Player mode, press the (Ref.7), (Ref.21) buttons to select Repeat play and press SELECT button repeatedly to turn repeat play on/off. A corresponding Repeat symbol appears in the status bar.
- Alternatively, press REPEAT button on remote control repeatedly to turn mode on/off.
Shuffle Mode
- Under menu of Music Player mode, press the (Ref.7), (Ref.21) buttons to select Shuffle play and press SELECT button repeatedly to turn shuffle play on/off. A corresponding Shuffle symbol appears in the status bar.
- Alternatively, press RANDOM button on remote control repeatedly to turn mode on/off.
Charge your device
You can charge your device through the USB socket on this unit with a USB cable (not supplied).
- The maximum current for USB charging is 1A.
- All devices for USB charging are not guaranteed.
- USB charging is not supported under Music Player mode
DAB Operation
Press MODE button on unit or remote control to access Mode Menu. Turn the SCROLL/SELECT dial on unit or press (Ref.8), (Ref.20) buttons on remote control to select DAB Radio mode, then press SCROLL/SELECT dial on unit or SELECT button on remote control to confirm. The unit will enter DAB mode and perform the auto scan function. During the scan the display will show “Scanning… ” together with a slide bar that indicates the progress of the scan and the amount of stations that have been found so far. Once the scan has finished, the unit will select the first alphanumerically found station. To explore the found stations, press (Ref.7), (Ref.21) buttons to select and press the SELECT button to confirm.
Station List
- During DAB mode, press the MENU button to access DAB menu.
- Press (Ref.7), (Ref.21) buttons to select Station list and then press the SELECT button to confirm.
- A list of DAB stations will show on the display.
Auto Scan
- Press the SCAN/Play/Pause button on unit or SCAN button on remote control to activate auto scan. Alternatively,
- Press the MENU button, and then press (Ref.7), (Ref.21) buttons to select Scan. Press the SELECT button to confirm.
1. The display will show “Scanning…” and a progress slide bar.
2. All the stations that have been found will be stored automatically. To explore and listen to the found stations, press (Ref.7), (Ref.21) buttons to select and the press the SELECT button to confirm.
Manual Tuning
As well as the auto tune function, you can manually tune the receiver. This can help you when aligning your aerial or when adding stations that were missed while auto tuning.
- Press MENU button to display the menu.
- Press (Ref.7), (Ref.21) buttons to select Manual tune, and press the SELECT button to confirm.
- The display will show the multiplex 5A to 13F.
- Press (Ref.7), (Ref.21) buttons to select the channel, and press the SELECT button to confirm.
- To listen to any stations found, return to the now playing screen and press (Ref.7), (Ref.21) buttons to select the required station from the station list and press SELECT button to confirm.
DAB Display Modes
Every time you press the INFO button on the unit or remote control, the display will show the following display modes:
DLS – Programme Type – Ensemble/Frequency – Signal error/Strength – Bit rate/Codec/Channels –Date
DLS (Dynamic Label Segment)
This is a scrolling message giving real-time information, e.g. song titles, news headlines, etc.
Programme Type
This describes the “style” or “genre” of the programme that is being broadcast.
Ensemble Name/Frequency
This display the name of the multiplex that contains the station you are listening to and the frequency. A
multiplex is a collection of radio stations that are bundled and transmitted on one frequency. There are
national and local multiplexes. Local ones contain stations that are specific to that area.
Signal Error/ Signal Strength
The error is shown as a number. If the number is 0, it means the signal received is error free and the signal
strength is strong. If the error rate is high, it is recommended to reposition the radio aerial or
reposition the unit. The display will show a slide bar to indicate the signal strength, the stronger the signal,
the longer the bar will be from left to right.
Bit Rate / Codec / Channels
The display will show the digital audio bit rate being received with additional information about the audio
codec and channel configuration.
Date
This displays the current date provided automatically by the broadcaster
Prune Invalid
You may remove all unavailable stations from the list.
- During DAB mode, press the MENU button and press (Ref.7), (Ref.21) buttons to select Prune invalid and the press SELECT button to confirm.
- Press (Ref.8), (Ref.20) buttons to select [YES] and press the SELECT button to confirm. Or select [NO] to cancel.
DRC (Dynamic Range Compression)
If you are listening to music with high dynamic range in a noisy environment, you may wish to compress the audio dynamic range.
- During DAB mode, press the MENU button and press (Ref.7), (Ref.21) buttons to select DRC and press the SELECT button to confirm.
- Press (Ref.7), (Ref.21) buttons to select DRC high/low/off and press the SELECT button to confirm the setting.
Station Order
You may wish to arrange the station listing order.
- During DAB mode, press the MENU button and press (Ref.7), (Ref.21) buttons to select Station order and press the SELECT button to confirm.
- Press (Ref.7), (Ref.21) buttons to select Alphanumeric/Ensemble and press the SELECT button to confirm the setting.
Saving and Recalling Preset Station
Refer to “Preset Stations” and “Recalling a Stored Station” under Internet Radio section for instruction.
FM Operation
Press MODE button on unit or remote control to access Mode Menu. Turn the SCROLL/SELECT dial on unit or press (Ref.8), (Ref.20) buttons on remote control to select FM Radio mode, then press SCROLL/SELECT dial on unit or SELECT button on remote control to confirm. The display will show the frequency.
Auto Scan
- Press the SCAN/Play, pause button on unit or SCAN button on remote control to start searching for a station. Once a station has been found, the scanning will stop automatically.
Alternatively, - Press and hold (Ref.7), (Ref.21) buttons to start searching for a station
The search may not stop at a station with a very weak signal
Manual Tuning
To search for FM stations manually, turn the SCROLL/SELECT dial on unit or press (Ref.7), (Ref.21) buttons on remote control repeatedly until your desired frequency is reached.
With FM radio, it may be necessary to fine tune each station by turning the SCROLL/SELECT dial on unit or pressing (Ref.7), (Ref.21) buttons on remote control repeatedly. Each press will adjust the frequency by 0.05 MHz. If reception is still poor, adjust the position of the aerial or try moving the radio to another location.
FM Display Modes
Every time you press the INFO button on the unit or remote control , the display will show the following display modes: Radio Text – Programme Type – Frequency – Date.
RDS Radio Text
This is a scrolling message information about the current programme.
Programme Type
This describes the “Style” or “Genre” of music that is being broadcast.
Station Name / Frequency
When an RDS station is received, the name of that station will be displayed, or if not the frequency will be displayed.
Date
This displays the current date provided automatically by the broadcaster.
Scan Setting
- Press the MENU button to access FM menu.
- Press (Ref.7), (Ref.21) buttons to select Scan setting and then press the SELECT button to confirm.
- Press (Ref.8), (Ref.20) buttons to select [Yes] to receive strong signal only and then press the SELECT button to confirm
Audio Setting
- Press the MENU button to access the main menu.
- Press (Ref.7), (Ref.21) buttons to select Audio setting and press the SELECT button to confirm.
- Press (Ref.8), (Ref.20) buttons to select [Yes] to listen in mono only or [NO] to let the unit select Stereo or Mono automatically.
- Press the SELECT button to confirm.
Alternatively, press the MONO/ST. button on the remote control to toggle between the Mono only or Mono/Stereo selection.
Saving and Recalling Preset Station
Refer to “Preset Stations” and “Recalling a Stored Station” under Internet Radio section for instruction.
Bluetooth Operation
The unit has a Bluetooth function that can receive a signal within 8 metres. Pair the unit with a Bluetooth device to listen to music:
- Press MODE button on unit or remote control to access Mode Menu. Turn the SCROLL/SELECT dial on unit or press (Ref.8), (Ref.20) buttons on remote
control to select Bluetooth Audio mode, then press SCROLL/SELECT dial on unit or SELECT button on remote control to confirm. - If the unit is not paired with any Bluetooth device, the bluetooth logo will start to flash to show the unit in pairing mode.
- Activate your Bluetooth device and select the search mode.
- “Majority Fitzwilliam 3” will appear on your Bluetooth device list.
- Select “Majority Fitzwilliam 3” and enter “0000” for the password if necessary.Once connected the Bluetooth logo on the screen will stop flashing. Your device is now paired with the unit.
- Press and hold Stop button on unit or press PAIR button on remote control can disconnect existing Bluetooth connection, with other Bluetooth devices able to locate and make connection with the unit.
- To disconnect the Bluetooth function, switch to another function on the unit or disable the function from your Bluetooth device.
Playing Music via Bluetooth
You may need to adjust the volume on your radio and Bluetooth device. Press the SCAN/12 button on unit or 12 w button on remote control to play/pause music or Press (Ref.8), (Ref.20) buttons on unit or remote control to skip to the previous/next track.
- The operational range between the unit and the device is approximately 8 metres. If the signal strength is weak, your Bluetooth receiver may disconnect, but it will re-enter pairing mode automatically.
- For better signal reception, remove any obstacles between the unit and the Bluetooth device.
- Compatibility with all devices and media types is not guaranteed.
- Some mobile phones with the Bluetooth function may connect and disconnect as you make and end calls. This is not an indication of a problem with your unit.
Auxiliary Input
You can play sound from an external device via the device
- Connect the external device to the Analog Audio Input on the device through suitable AUX cable (not include).
- Press MODE button on unit or remote control to access Mode Menu. Turn the SCROLL/SELECT dial on unit or press (Ref.8), (Ref.20) buttons on remote control to select AUX In mode, then press SCROLL/SELECT dial on unit or SELECT button on remote control to confirm.
- Turn the Power/VOLUME dial on the unit or press the VOL +/– buttons on the remote control to adjust the volume control for your desired sound output level. Set the desired volume on the radio and the external audio device if necessary.
- In AUX mode, operate your audio device directly for playback features.
When connecting the external audio device, refer to the owner’s manual of the external device
NetRemote
The device gives a feature of NetRemote by smartphone or tablet in iOS or Android system. By downloading the assigned app named UNDOK, you can view all the modes of Internet radio, Podcasts, Spotify, Music Player, DAB, FM, Bluetooth and AUX In. Search UNDOK from Google Play or Apple Store for UNDOK app,
and install it to your smartphone or tablet. Before using the UNDOK app, make sure the device and the smartphone or tablet are in the same WiFi
network. Launch the app. The app initializes and scans for the device in the network. Tap the device to make the NetRemote connection.
– Once the smartphone or tablet has already accessed the device, they will automatically connect the next time when you open the app again.
– Be aware that if another smartphone or tablet with the app in the same network has access with the device; the original connection will be cut off.
When it is the first time that you connect the device to the unit, the app may ask you to enter the PIN. Default PIN is 1234. For details of changing the PIN for security, please refer to System Settings section: Network – NetRemote PIN Setup. Select your desired mode in the main page. You may then control the selected mode on your smartphone or tablet and on the device simultaneously.
Using headphones
Do not listen to music at high volume when using headphones. Doing so can cause permanent hearing impairment. Turn the tuner volume level to the lowest before using headphones. Only use headphones with a 3.5 mm jack plug. Insert the headphone connector in the headphone socket in front of the unit.
Long-term exposure to loud music may cause hearing damage. It is best to avoid extreme volume when using earphones, especially for extended periods of time.
Setting the Alarm
- Press ALARM button on the remote control, the display shows “Alarm (1 or 2): Off [hh:mm]”.
- Press (Ref.7), (Ref.21) buttons to select the Alarm number (1 or 2) and then press the SELECT button to start the setting of the following parameters.
Press (Ref.7), (Ref.21)buttons to select then press the SELECT button to confirm
- Enable Off/ Daily/ Once/ Weekends/ Weekdays
- Time (Alarm On time)
- Mode Buzzer/ Internet radio/ DAB/ FM
- Preset Last Listened/ (Preset station)
- Volume 0-32
- Save Save and confirm the alarm setting
- Finally, select “Save” and press the SELECT button to save the alarm setting. The display will show Alarm Saved. When the alarm is set, the alarm icon will appear on the display.
- To temporarily switch off alarm, press the SNOOZE button on remote control to activate Snooze function when alarm sounds. Press the SNOOZE button on remote control repeatedly to set snooze period time of 5, 10, 15 or 30 minutes in turn. The set snooze time will show on the display and unit will go to standby.
- To turn off the alarm when it sounds, press the q/VOLUME dial on unit or q button on remote control, or ALARM button on remote control.
Cancelling the Alarm
- Press ALARM button on the remote control, the display shows “Alarm (1 or 2): On [hh:mm]”.
- Press the (Ref.7), (Ref.21) buttons to select the Alarm number (1 or 2) and then press SELECT button to start the setting of the timer.
- Press the (Ref.7), (Ref.21) buttons to select “Enable” then press the SELECT button to confirm.
- Press the (Ref.7), (Ref.21)buttons to select “Off” then press the SELECT button to confirm.
- Finally, select “Save” and press the SELECT button to save the setting.
- Alternatively, during Standby mode, press the ALARM button on remote control repeatedly can turn the saved Alarm 1/2 on/off sequentially.
Specification
Brand Majority
Model Fitzwilliam 3
System Section
Power Supply AC100-240V ~ 50/60Hz
Power Consumption 7.8W
Working Environment –
Temperature 0 ~ 35 °C
Net Weight Main unit: app. 2.3 kg
Unit Dimension (W) × (D) × (H) 435 x 298 x 74 mm
Radio Frequency FM 87.50 – 108.00 MHz DAB 174.928 – 239.200 MHz