A. Oakcastle CD150 Wall CD Player
B. Remote Control
C. Pack of screws
D. User Manual
E. USB to Type-C charging cable
F. Wall-mounted plate
G. Desk Stand

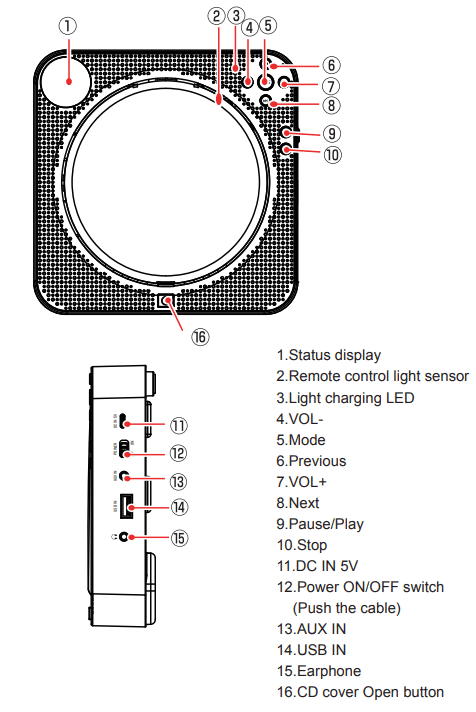
Controls and Functions
Remote Control

1. STANDBY When the power on, turn the unit on/off.
2. Number Pad (10+) Press this button to enter the 10+ songs such as 10,20,30,etc.
3. PLAY/PAUSE Press PAUSE button to pause playback. Press it again to continue playing from where it was paused.
4. STOP Press STOP button to stop playback. Press PLAY Button to play from the beginning.
5. MUTE Press to mutes the audio output on the player.
6. VOL+/VOLPress to increase or decrease the volume output.
7. MODE Press to change the playing mode.
8. PROGRAM button apply for CD, USB, AUX, Bluetooth, FM Radio, MP3, WMA & HD-CD. This function allows you randomly assign 20 songs (max) and play them in order.
9. AUX IN Connect it with the AUX output device(such as DVD player, CD player or Mobile phone etc) via AUX cable.
Setting up your CD150
Basic Operation
1. How to Turn the Player on/off.
A.the power switch is located on the side. Please toggle it to ON position to play normally.
B.the power switch is located on the side. Please toggle it to OFF position to turn it off.
2. How to Charge for the Player Connect the supplied USB charging cable with the power adapter, then plug it into a power source to charge the player. OR Connect the supplied USB Charging cable to a computer/ desktop/car charger/power bank to charge it. Charging Time: It will take about 4 hours for a full charge. When charging, the charging indicator on the player will be RED. Once the player is fully charged, the indicator will turn to GREEN.
When the player is in low battery, the LCD screen will be flashing. Please charge it.
3. How to set up Repeat/play mode Each time the REPEAT button on the remote control is pressed, the order of the tracks played will be as follows:Repeat1(REP1), Repeat all(ALL), random play(SHUF)
4. How to Program the Play, Press the PROG button to enter the programming mode when the play stops, press the PREVIOUS or NEXT button to select the track you want to program, press PROG again to confirm the programming. Up to 20 tracks can be programmed in this mode. After that, press the PLAY button to enter the programming play mode. Press the STOP button directly to enter the stop mode to cancel or reprogram.
5. How to setup EQ effect Press the EQ button to changes the different sound effects. There are a total of 5 sound effects: BBS, POP, JAZZ, ROCK, and CLASSIC, FLAT.
6. A-B Repeat
A. During playback press “A-B” to set the Staritng Point A.
B. Press “A-B” a second time to set the Ending Point B and player will repeatedly play the part between Point A and Point B.
C. Press “A-B”a third time to cancel “A-B” repeat and resume normal playback.
Bluetooth Mode Instructions
- Press the “MODE” button to switch to Bluetooth mode, the “ ” will show on the LED display, then the unit will be ready to pair other Bluetooth devices such as mobile phone, pads etc.
- Activate the Bluetooth in your mobile phone and it will automatically search nearby Bluetooth device to pair.
- Choose the name ” Oakcastle CD150 ” device in your mobile phone Bluetooth device list to pair.
- Your mobile phone will be paired/connected to the CD player in a few seconds.
- Playing music on your mobile phone and the audio will be transmitted to the CD player speaker through.
This Player is not compatible with Bluetooth headsets, speakers and Car’s Bluetooth
USB Mode Instructions
- Plug in a USB-stick to the CD player USB port.
- Press the “MODE” button to switch to USB mode.
- The CD player will read and play the music in the USB-stick automatically.
1 Supports a maximum 32GB USB flash drive, which must be FAT32 format. 2. If can’t read the USB-stick, please check the format and capacity. If not FAT32 format, please format it to FAT32.
FM Mode Instructions
- Press the “MODE” button to switch to FM radio mode.
- press the “Play/Pause ” button to go to auto searching, the channels will be automatically stored when channels.
- After auto searching finished, press “ ” or ” ” button to adjust channels. (Note : the channels storage capacity is 40 channels. P1-P40)
