Tru 2 ANC Earbuds
Box Contents
- Set of Tru 2 ANC Wireless Earbuds
- 3x Tru Ear Tips
- 1x USB-C Cable
- 1x Charging case

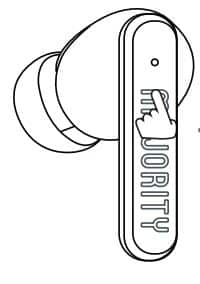
Controls and Functions
- LED
- Touch Key
- Silicone Tip
- MIC
Instructions Guide
Operations of the touch Keys
Left/Right earbuds operation
Pause / Play
- click (left / right) earbuds touch panel once.
Previous song / next song
- Double press the left ear touch function key for previous song.
- Double press the right ear touch function key for the next song.
Phone Call functions
Answer a call
- Press once on any earbud’s touch controls.
End a call
- Double press any earbuds touch controls.
Rejecting incoming calls
- Double press any earbuds touch controls.
Turn on the voice assistant
- Press three times on any touch function key to wake up the voice assistant.
Noise reduction control
- long press any touch function key for 2 seconds to switch the noise reduction mode. (transparent / ANC ON/ANC OFF).
Mode Indicator Lights
Earbuds
Put the earbuds in the charging box and the earbuds will charge automatically
Pairing status,
The white light in the right ear flashes once in 0.5 seconds, and the light in the left ear goes out. Connected light off
State of charge
During charging, the white light stays on and the full light goes out.
Low power state
The white light flashes twice every 20 seconds
Charging Case
To charge the case use a type-C cable or a 5V Adapter
Charging
white light flashes
Charging completed
The white light is always on.
The charging box charges the earbuds:
The power is 10% ~100%: the white light is on for 4 seconds and is off power 10%~1%:the white light flashes for 1 second and then goes out after 4 seconds
Bluetooth Operation
Pair to the Tru 2 ANC earbuds
The left and right earbuds will automatically reconnect, if already have made a previous connection.
Open the charging box, turn on the earphones, The right earbuds will enter the pairing state, the white light will flash once every 0.5 seconds, and the left earbuds will be off. Click and select the corresponding headset name in the Bluetooth list to connect on your phone, tablet or PC/laptop.
Turn on
Open the charging case cover. Press and hold the touch key for about 1.5 seconds in the off state.
Turn Off Methods
- Put in the charging box and close the cover.
- Press and hold the touch key for 5 seconds in the power-on state.
- Automatic shutdown after 2 minutes without Bluetooth connection.
- Turn off one side and the other side will shutdown
Charging the Case
To charge the case please connect the USB-USBC cable provided to the USB-C port on the back of the charging case.
Charing Status
White light flashing
Charging Complete
The white light stays on
When the charging box is low
The white light flashes.
Troubleshooting
- Earbuds cannot be switched on Please check whether the earbuds are
powered on if they are not, please charge them and turn on again. - Bluetooth pairing failed. Make sure that the earbuds are powered on and, in the case, ready for pairing connection and the pairing distance is kept within 1m.
- Automatic loopback After power on, the last paired connected mobile phone will be automatically connected back
- How long will it turn off automatically if it is turned on and not connected After the earbuds is turned on, if no other Bluetooth device is connected,
it will automatically turn off after 2 minutes.
Warranty
Register your Majority product within 30 days of purchase to activate your extended 3 Year Warranty. Gain access to all the benefits and lifetime technical support (see our Extended Warranty details for more info).
Specifications
| Bluetooth Version | Bluetooth 5.3 |
| Effective Range | 10 Meters |
| Input | DC5V 450mA |
| Charging Time | Approx 1H |
| Play Time | Approx 5-6 hours |
| Weight (Single Earbud) | 4.5g |
Safety Info
IMPORTANT
Please read all instructions carefully before use.
WARNING
Risk of electric shock. Do not open.
- Read these instructions:
- Heed all warnings.
- Follow all instructions in the user manual.
- Do no clean the apparatus near or with water.
- Do not block any ventilation openings. Install in accordance with the manufacturer’s instructions.
- Do not install near any heat sources such as radiators, heat registers, stoves, or other apparatus (including amplifiers) that produce heat.
- Protect the power from being walked on or pinched particularly at plugs, convenience receptacles, and the point where they exit from the apparatus.
- Only use attachments/accessories specified by the manufacturer.
- Unplug this apparatus during light storms or when unused for long periods of time.
- Refer all servicing to qualified service personnel. Servicing is required when the apparatus has been damaged in a way, such as power-supply cord or plug is damaged, liquid has been spilled or objects have fallen into the apparatus, the apparatus has been exposed to the rain or moisture, does not operate normally or has been dropped.
- No naked flame sources, such as lit candles, should be placed on the apparatus.
- Dispose of used electrical products and batteries safely according to your local authority and regulations.
Addition Warnings
The apparatus shall not be exposed to dripping or splashing and no objects filled with liquid, such as vases, shall be places on the apparatus.
Main plug is used to disconnect device and it should remain readily operable during intended use. In order to disconnect the apparatus from the main power completely, the power plug should be disconnected from the main socket outlet completely.
Battery shall not be exposed to excessive heat such as sunshine, fire or the like.
Recycling Electrical Products
You should now recycle your waste electrical goods and in doing so help the environment. This symbol means an electrical product should not be disposed of with normal household waste. Please ensure it is taken to a suitable facility for disposal when finished with.
Download/print as a PDF
Want to save the above instructions as a PDF? Simply click the print icon below to save or print the user manual.
Contact Support
Having an issue with your product or can’t figure something out? Get in touch with our support team.